DevOps is a term developers are familiar with by now. The term DevSecOps is now becoming popular, and gets lots of press. The “sec” part stands for security, but adding the “sec” is not so obvious or simple. One approach we can take to add some “sec” is to make sure the libraries our code depends on are safe. This step is only one facet of “sec” in DevSecOps. Ultimately the vulnerabilities in our dependencies are the library author’s responsibility, but we can take steps in our own project to understand the risks we face when using a library, and be informed so we can make choices to mitigate that risk.
This post demonstrates how to use the OWASP Dependency-Check tool to scan your project’s dependencies for known vulnerabilities in a CI/CD pipeline. Check out my previous post for more detail on this tool. This post outlines how to add dependency-check to a Vue.js project and apply the tool during a CI/CD build with Jenkins and publish the results to SonarQube. The files used in this post are found in this repo.
Getting Set Up
My team uses Jenkins for CI/CD. The simplest way to add dependency-check to your CI is to add it as a plugin for Jenkins. This takes care of any dependencies and lets you add it as a step in your CI, and publish the results on your job’s page.
On the other hand, I’m not a fan of Jenkins plugins. Troublesome builds on a Jenkins server are difficult to debug, and plugins make it harder. I prefer to be able to run build scripts locally, so my team routinely uses shell scripts for our builds, and Jenkins becomes a job runner and publisher of information instead of a collection of plugins cobbled together to create a build job. This adds some complexity as you need to install components on the server directly that may have been installed by a Jenkins plugin. And of course you’ll need those components installed locally as well. But if you have ever been stuck in a seemingly endless commit-push-build cycle trying to get a broken job to complete on the server you can appreciate this approach. I can run a script locally and make changes until it works before trying to publish the job on Jenkins. If it fails on Jenkins the culprit is likely server configuration and not something with the build script. When you use a Jenkins plugin it’s difficult to tell the difference between those two kinds of errors.
Look at my previous post for guidance on installing OWASP Dependency Check. You’ll have to install it on the build server and locally if you want to troubleshoot scripts on your machine.
The output of the Dependency Check scan can be published to Jenkins if you have the plugin installed. You can also publish results to SonarQube, a terrific static analysis tool for your code. In my case, we use SonarQube so that’s the route I’m describing. Since the test app is a Vue.js web application, we need to install a scanner for SonarQube. In my project I add:
npm install --save-dev sonarqube-scanner
Since it’s a development dependency it won’t be added to the final build code. Our build script needs to communicate with SonarQube, so there are environment variables set to take care of credentials. You can set them on the server directly or use a Jenkins plugin to set them for the job or build node.
SONAR_URL=<YOUR SONAR URL>
SONAR_USER=<YOUR SONAR USERNAME>
SONAR_PASSWORD=<YOUR SONAR PASSWORD>
To run the script locally create a file called .env.local and add the values above to the file. The build script will pick up that file and set the environment variables for the duration of the script run.
There is also a sonar-project.properties file in the project. I use this file to set the defaults for SonarQube and set the thresholds for SonarQube to report the severity based on the number of identified vulnerabilities.
sonar.host.url=${env.SONAR_URL}
sonar.exclusions=dist/**/*,reports/*,coverage/**/*
sonar.login=${env.SONAR_USER}
sonar.password=${env.SONAR_PASSWORD}
sonar.dependencyCheck.jsonReportPath=reports/dependency-check-report.json
sonar.dependencyCheck.htmlReportPath=reports/dependency-check-report.html
sonar.dependencyCheck.severity.blocker=9.0
sonar.dependencyCheck.severity.critical=7.0
sonar.dependencyCheck.severity.major=4.0
sonar.dependencyCheck.severity.minor=0.0
sonar.projectKey=demo-web
In the SonarQube application itself you also need to enable the Dependency Check plugin in the Marketplace section of the app’s Administration area:
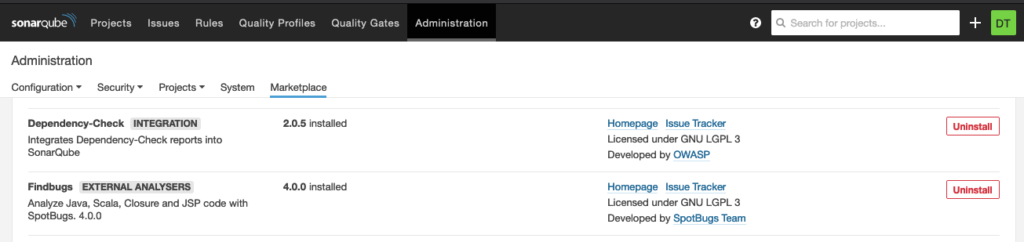
The dependency-check scanner creates output as XML, JSON, and HTML, but it’s up to you to choose which formats to generate. I create all three as output, you could do less depending on your circumstance. The Jenkins plugin wants XML and HTML in order to publish on your job’s page. SonarQube wants JSON and HTML to publish on that platform.
The Build Script
These are the steps our build script will take:
- npm install
- Run unit tests
- Build for production
- Create a Docker container
- Deploy the container
- Scan the code for vulnerabilities
- Upload the results to an instance of SonarQube
#!/bin/bash

echo 'Clean up build directory'
git clean -fdx

echo 'npm tasks'
# Install dependencies
npm install

# Run unit tests
npm run test:unit

npm run build

# Create a Docker image
echo 'Docker tasks'
imageName="demo-web:1.0."

if [ -z ${BUILD_NUMBER+x} ];
    then
	echo "var is unset"
	imageName="${imageName}1"
	echo "build set to one";
    else
	echo "var is set to '$var'"
	imageName="${imageName}${BUILD_NUMBER}"
	repoName="${repoName}${BUILD_NUMBER}"
fi

docker build -t "${imageName}" .

# Remove running instances
echo 'Stop running container'
docker stop demo_web || true

echo 'Remove existing container'
docker rm demo_web || true

echo 'Start a new container'
# Start a container with this image
docker run --name demo_web --restart=always -v /data/log/demo-web:/var/log/nginx/log:rw -p 80:80 -p 443:443 -d "${imageName}"

# Clean up unused images
echo 'Remove old images'
# docker image prune -f

# Scan with dependency-check
echo 'Scan dependencies'
mkdir reports || true
dependency-check --scan ./ -f JSON -f HTML -f XML -o reports

# Set environment variables for Sonar credentials (local only)
set -a
. ./.env.local

echo 'SonarQube analysis'
# Run SonarQube scanner
./node_modules/sonarqube-scanner/dist/bin/sonar-scanner
Now you can create a job in Jenkins and use the script to build, deploy, and analyze our code. You can test this running the build script locally on the command-line too. If you are really intent on Jenkins, you could easily recreate that build script as a Jenkinsfile, but you won’t be able to test it locally.
The Results
When dependency-check runs, the results end up in the reports directory as specified in the build script. In the sonar-project.properties file we told the sonar scanner where to find these files. The scanner uploads them to SonarQube and integrates them into the results view:

The scan found three vulnerabilities and gave us a failing grade of “D” and kept our app from passing the quality gate set in SonarQube. Click the number of vulnerabilities link to see the detail:
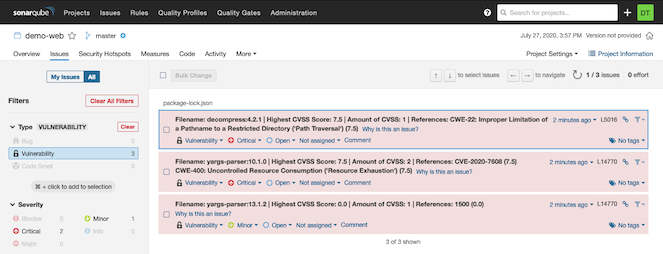
The three libraries identified were not libraries we added directly with npm. The three vulnerable libraries discovered in this example are:
- decompress:4.2.1
- yargs-parser:10.1.0
- yargs-parser:13.1.2
They are transitive dependencies of some other library we installed. We need to track them down. At the command-line we can run npm list <libraryname> to find out. I tried it for yargs-parser which was listed in two of the vulnerabilities reported by dependency-check:
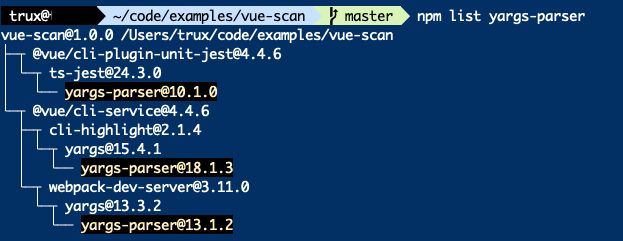
The yargs-parser library actually occurred in three dependencies, all using different versions, two of which (versions 10.1.0 and 13.1.2) had a vulnerability. Luckily for us these occurred in our development dependencies, so they were not included in the built application. If they do end up as a dependency that gets deployed, you need to take some actions:
- Report the problem as an issue in the library’s repo
- Better yet, fix the problem and create a pull request at the library’s repo
- Try changing the version in your package-lock.json file. Then re-run
npm installand test your application. If we follow the links in the report we find out that versions 13.1.2, 15.0.1, 18.1.1 or later are not (as) vulnerable. There is no guarantee that the later version will not break the library depending on it though. YMMV. - Find a different library to solve the problem
OWASP Dependency Check adds awareness of your Vue app’s dependencies for vulnerabilities in your CI/CD process. You can’t fix problems you are not aware of, and this tool provides awareness, and my example shows how you surface that awareness in SonarQube. Add the OWASP Dependency Check tool and publishing steps to your CI/CD process and build safer software.